Difference between revisions of "Dialog: Administer OPC UA Application"
| Line 48: | Line 48: | ||
; Import Trusted | ; Import Trusted | ||
| + | : Imports a certificate from a file, and makes it a Trusted certificate. You can select from several file formats. | ||
; Import Issuer | ; Import Issuer | ||
| + | : Imports a certificate from a file, and makes it an Issuer certificate. You can select from several file formats. | ||
; CM Operations: Refresh Trust Lists | ; CM Operations: Refresh Trust Lists | ||
| + | : Refreshed the trust lists from the Certificate Manager (CM)/Global Discovery Server (GDS). Use this command if the certificate stores of your application are not up-to-date. The CM/GDS endpoint is configured elsewhere in the application. | ||
== Other controls == | == Other controls == | ||
Revision as of 08:05, 22 May 2023
This dialog allows you to administer the OPC UA application. It contains settings and operations that enable the OPC UA application to coexist and communicate properly in the operating system and in the OPC UA ecosystem.
The "Administer OPC UA Application" dialog allows:
- Viewing and managing trusted certificates. The user can change the Trusted, issuer and Rejected states of the certificates, import certificates, and delete certificates.
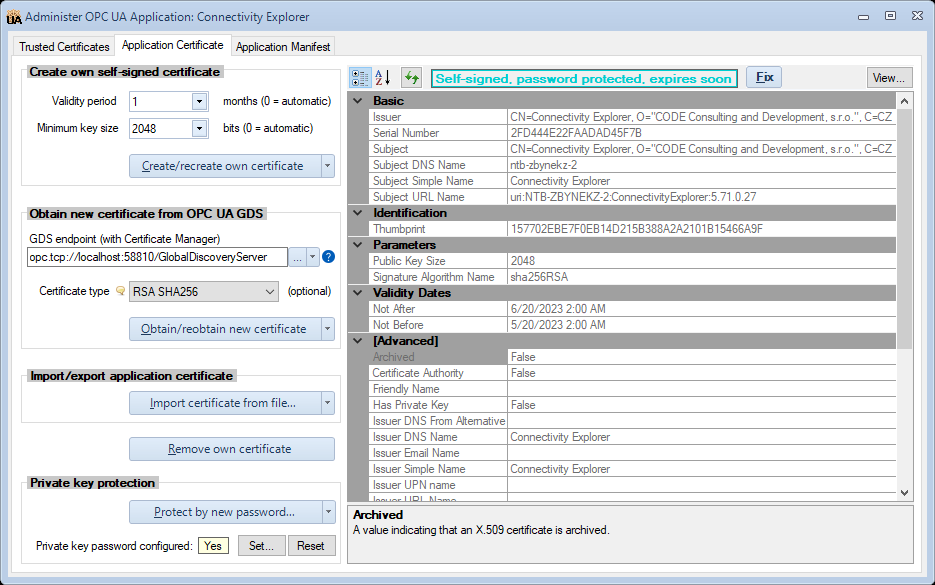
- Managing the own application certificate, either using self-signed approach, or from an OPC UA Global Discovery Server (GDS). The application certificate can be exported or imported. The user can also protect the private key of the certificate with a password, or unprotect it. Automatic fixes are offered for common issues with the application certificate.
- Viewing OPC UA application manifest.
The above listed aspects correspond to individual tabs on the dialog. If there is an important issue that needs your attention, the affected tab is displayed with an error or warning icon.
You can switch between the tabs as needed. When you are done with the dialog, press Esc or click the little cross icon in the upper right corner.
Contents
Trusted Certificates tab
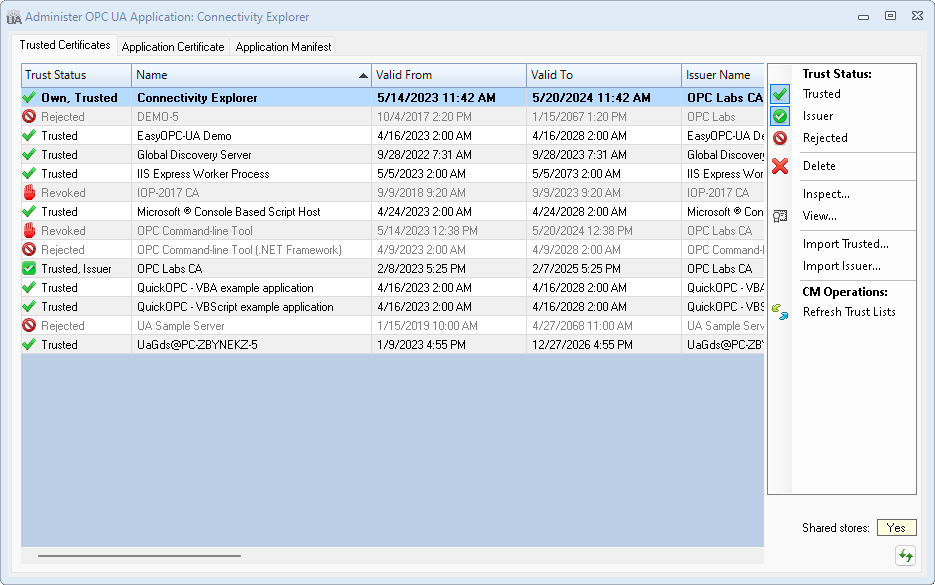
The Trusted Certificates tab shows the certificates in various certificates stores of the application, and allows you to view and change how the application you are administering trusts other OPC UA applications.
Certificates grid
The certificates are displayed in a single table (grid), with their trust status indicated textually and by an icon. In reality, the certificates are stored in several certificate stores with different purposes. The table shows a logical view, where the trust status is inferred from the placement of the certificate. Operations that change the trust status do, in fact, copy, move and remove certificates in the certificate stores.
Information in the table that may need your attention is distinguished by formatting: for example, certificate validity dates that are expired are displayed in different color.
You can sort the table in ascending or descending order by clicking (or repeated clicking) the column header you want to sort on. Column width can be adjusted by dragging the divider line between the columns in the header area. Hovering over an incomplete information (for example, if the column is too short) shows a tooltip with the full content of the table cell.
Select the certificate you want to work with by clicking on its row in the table, or using the arrow keys on the keyboard when the table is focused.
Actions
- Trust Status: Trusted
- Sets or resets the Trusted status of the selected certificate. Self-signed, leaf, root CA or sub-CA certificates can be trusted. A certificate that is neither Trusted nor an Issuer or Own certificate is automatically given the Rejected status; conversely, the Rejected status is removed from any certificate that is Trusted.
- Trust Status: Issuer
- Sets or resets the Issuer status of the selected certificate. Issuer certificates are certificates used for validation of the certificate chain, but are not by itself trusted. A certificate that is neither Issuer nor Trusted or Own certificate is automatically given the Rejected status; conversely, the Rejected status is removed from any certificate that is has an Issuer status.
- Trust Status: Rejected
- Sets or resets the Rejected status of the selected certificate. Rejected certificates do not participate in trust evaluation; they are just conveniently "marked" for further review or deletion. Setting the Rejected status automatically removed the Trusted and Issuer stattsu form the certificate; removing the Rejected status from the certificate gives the certificate the Trusted status.
- Delete
- Permanently deletes the selected certificate from all application certificate stores. The dialog will ask you for confirmation.
- Inspect
- Displays all properties of the selected certificate in a property grid.
- View
- Shows the selected certificate using the standard operating system (Windows) user interface.
- Import Trusted
- Imports a certificate from a file, and makes it a Trusted certificate. You can select from several file formats.
- Import Issuer
- Imports a certificate from a file, and makes it an Issuer certificate. You can select from several file formats.
- CM Operations: Refresh Trust Lists
- Refreshed the trust lists from the Certificate Manager (CM)/Global Discovery Server (GDS). Use this command if the certificate stores of your application are not up-to-date. The CM/GDS endpoint is configured elsewhere in the application.
Other controls
- Shared stores
- Indicates whether the certificate stores (where the certificates displayed in the tab are located) are possibly shared with other applications. Note: The value displayed is based on the common locations of certificate stores. In case some the locations are configured in a special way, the status might not be correct.
- No
- The certificate stores are configured to serve this application only.
- Mixed
- Some of the certificate stores are configured to serve this application only, while others are shared by multiple applications on the computer.
- Yes
- The application uses certificate stores that are shared by multiple applications on the computer.
- When the shared status is "Mixed" or "Yes", you need to be aware that operation that you make in this tab also affect the trust settings of other applications on the computer. In order to find the location of individual certificate stores, hover the mouse cursor over the shared status value, and a tooltip will be shown with store locations, and statistics of their usage. You can also switch to the Application Manifest to view how the certificate stores are configured.
- Refresh View
- Press this button in case the contents of certificate stores might have changed by an external actor, i.e. by something that has not been invoked from this dialog - for example, if you have manually copied some certificate into the store, or removed it.
Application Certificate tab
Own Certificate View
Application Manifest tab
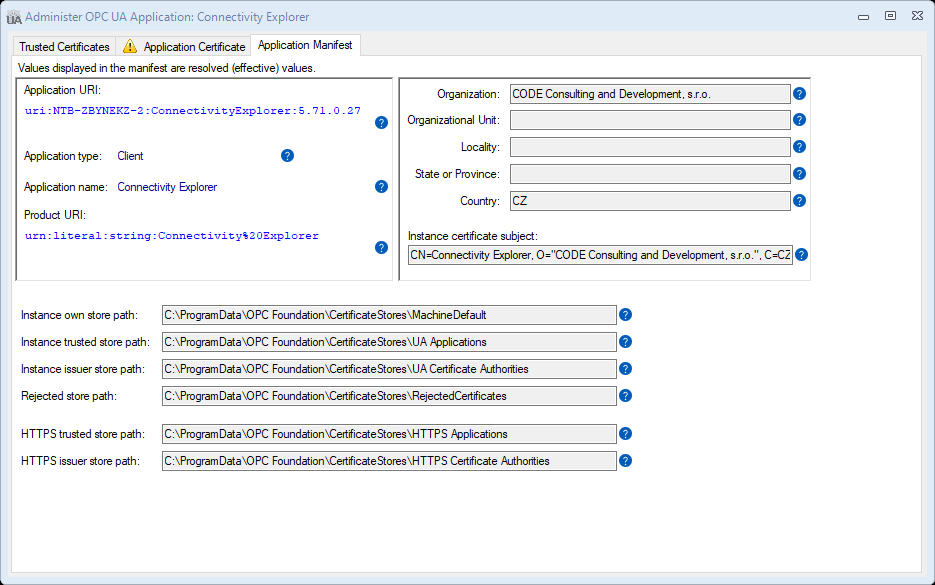
The OPC UA application manifest contains the application registration information together with data related to PKI administration, such as paths to the certificate stores used.
The information contained in the OPC UA application manifest can roughly be divided into three areas:
- Information that identifies or otherwise integrates the application in the OPC UA ecosystem, such as application URI, application type, application name, and product URI.
- Information needed to create the application instance certificate, such as the certificate subject name or its parts. Note that the certificate also contains some of the information described above, such as the application URI.
- Information that allows the OPC UA application to execute and be administered in the operating system environment, such as location of the certificate stores it uses.
This logical separation is reflected in how the information is laid out on the Application Manifest tab:
You cannot change the information in the Application Manifest tab; it comes from the OPC UA application itself. Use this tab mainly to verify that the information displayed is correct, and/or to share it with other parties. For example, the application URI is needed in some scenarios to connect to the application.
The information displayed reflects the final (effective) values, those that the application actually uses. Behind the scenes, the application manifest might be composed from several (partial) sources, and some elements (such as the certificate store paths) then go through a final resolution step.
If any issues were found, the bottom part of this tab shows warnings and error messages related to the application manifest.
Common procedures
Probably by far the most common usage for this dialog is to establish a trust of your application with a previously untrusted peer application, using self-signed certificates for application authentication. If the two applications attempt to connect in a secure way for the first time, and the trust is not configured, the other party certificate is rejected, and is placed into the Rejected certificate store (which as shows as "Rejected" trust status in the "Trusted Certificates" tab).
In order to establish trust to an application with a self-signed certificate that has been rejected:
- Open the "Administer OPC UA Application " dialog.
- Switch to the Trusted Certificates tab.
- Locate the rejected certificate of the other application in the table. It will have "Rejected" in its Trust Status, and the name of the application and other identifying information will match the other application.
- Verify that the thumbprint of the certificate is identical to the known thumbprint of the certificate of the other application. This is an important step for security; if you skip it, you might end up trusting and connecting with an unintended, possibly rogue application. The other application will typically have some way to display the thumbprint of its certificate to the user. To verify the thumbprint, either:
- Select the Inspect action, find the Identification: Thumbprint row in the property grid, and verify the thumbprint. Then press the OK button.
- Select the View action, switch to the Details tab, find the Thumbprint row in the field list, and verify the thumbprint. Then press the OK button.
- If the thumbprint in the previous step was correct, select the Trust Status: Trusted action. This will change the trust status of the selected certificate from Rejected to Trusted.


