Test Tools: Difference between revisions
No edit summary |
No edit summary |
||
| Line 1: | Line 1: | ||
[[Category:Testing]] | [[Category:Test tools]] [[Category:Testing]] | ||
== Introduction == | == Introduction == | ||
QuickOPC test tools are of interest to advanced users. | QuickOPC test tools are of interest to advanced users. | ||
Revision as of 18:02, 10 October 2016
Introduction
QuickOPC test tools are of interest to advanced users.
The test application contains functionality related to both OPC “Classic” and OPC Unified Architecture specifications. The tool allows exploration of various API objects and members, testing of the UI dialogs, live data view with multiple items, etc.
The test tools are not installed by default; you need to select “Custom Install”, and then specifically enable them on the “Select Components” page in in the installation wizards. After installation, the test tools can be reached through the Start menu, in the “Test Tools” group under product menu.
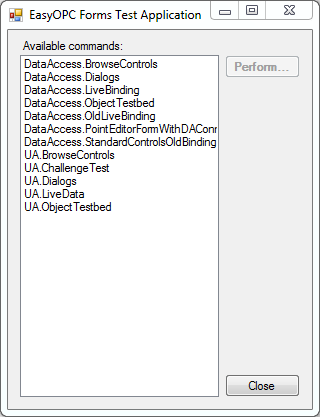
The test tool starts with a “switchboard” dialog that allow you to select the particular type of test.
Note that most tests are modeless, meaning that you can open multiple test forms of the same type concurrently, or even combine them with test forms of other types.
The following paragraphs describe certain particular types of tests available.
Main Switchboard Commands
Dialogs
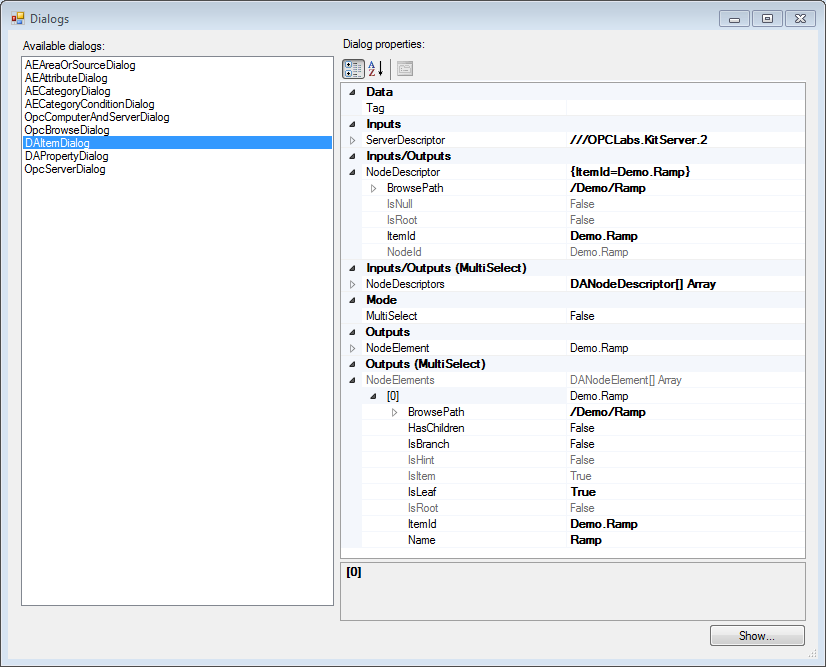
This test allows you to pick one of the OPC common dialogs, provide inputs for it, run it, and then explore its outputs.
Select the dialog in the “Available dialogs” list. Then, use the property grid to enter the dialog inputs, if any are needed. When all the inputs are entered, press the “Show…” button. This will run the dialog. After you close the dialog, you can use the property grid again to view any modified (output) arguments.
Live Data
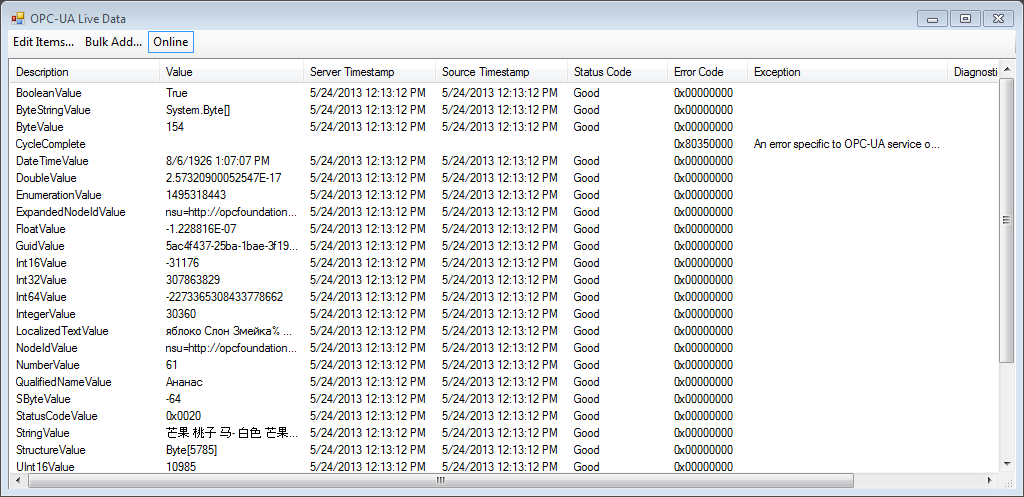
This test allow you to monitor multiple items concurrently.
There are following commands available in this test:
- Edit Items: Displays a collection editor, where all the items can be viewed and edited, and items can be added or removed individually.
- Bulk add: Display a multi-selection browse dialog, where you can select the items to be monitored, and add them all at once.
- Online: Toggles whether the items are subscribed or not.
Object Testbed
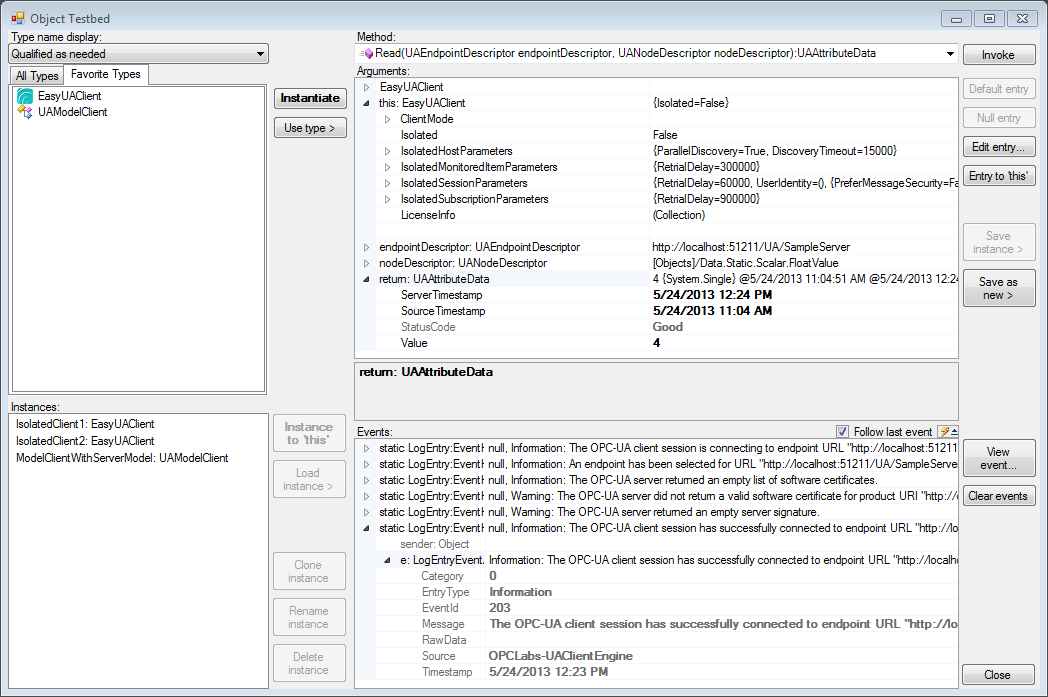
The Object Testbed is a very general test form. It allows testing of any .NET object as if you were using it inside a programming language. It allows you to interactively create instances of various objects, explore and modify their properties, call methods, and observe the generated events.
The form allows you to work with one object instance at a time. You create this instance by selecting a type from the list or tree of available types, and then pressing the “Instantiate” button. You can later replace the instance by a new one, by repeating this sequence.
After the form is first open, it comes up with an initial instance of the most common type in the API, if defined, to make your life easier. The most commonly used types are offered on the “Favorite Types” tab. You can also select from the full list of available types, on the “All Types” tab.
It is also possible to work just with the static members of any type, without creating an object instance. To work with just the static members of the type, select the type, and press the “Use type” button.
When you have selected the instance (or type), its properties appear in the “Arguments” property grid. You can explore the property values, or enter new ones.
In order to call a method on the instance (or type), select it from the “Method” drop-down. The method arguments (inputs and output, and possibly its return value) appear in the “Arguments” property grid as well. You can now enter the input arguments for the method call. When you are finished, press the “Invoke” button. The method will be called, and the modified arguments (and possibly the return value) will appear in the “Arguments” property grid again. If the method call throws an exception, you will be presented with a dialog box that allows you to view all the exception details.
The test automatically hooks to all events available on the instance (or type), and captures them for inspection in the “Events” box. You can also individually choose which events will be hooked to, using a small button with “event” icon above the “Events” box.
The Object Testbed form also keeps a list of named instances, and allows you to load and save instances from/to this list. This is useful e.g. when you want to use a result of one method call as a new instance under test, or for use as a property value or input argument of another method call.
Selected Usage Scenarios
This chapter describes how to use the Test Tools in specific usage scenarios.
OPC-UA Attribute Services
Read a Single Node
- Start the “EasyOPC Forms Test Application”.
- Select and perform the “UA.ObjectTestbed” command. The “Object Testbed” form appears.
- In “Method” drop-down, select the following method: Read(UAEndpointDescriptor endpointDescriptor, UANodeDescriptor nodeDescriptor): UAAttributeData
- In the “Arguments” property grid, select the row “endpointDescriptor: UAEndpointDescriptor”, and click the “…” button on the right.
- From the “Browse for Host and OPC-UA Server” dialog, select the OPC-UA server endpoint, and press OK.
- In the “Arguments” property grid, select the row “nodeDescriptor: UANodeDescriptor”, and click the “…” button on the right.
- From the “Browse for OPC-UA Data” dialog, select the OPC-UA node to read, and press OK.
- Press the “Invoke” button to read the data.
- If an errors occurs, a box with the exception details will appear. In case of success, the data read will be in the “Arguments” property grid. You can view the data in the row “return: UAAttributeData”; click the “+” sign to expand the row.
Read Multiple Nodes
- Start the “EasyOPC Forms Test Application”.
- Select and perform the “UA.ObjectTestbed” command. The “Object Testbed” form appears.
- In “Method” drop-down, select the following method: ReadMultiple(UAReadArguments[] readArgumentsArray): UAAttributeDataResult[]
- In the “Arguments” property grid, select the row “readArgumentsArray: UAReadArguments[]”, and click the “…” button on the right.
- In the “UAReadArguments Collection Editor”, press the “Add” button.
- In the property grid, select the “EndpointDescriptor” row, and click the “…” button on the right.
- From the “Browse for Host and OPC-UA Server” dialog, select the OPC-UA server endpoint, and press OK.
- In the property grid, select the “NodeDescriptor” row, and click the “…” button on the right.
- From the “Browse for OPC-UA Data” dialog, select the OPC-UA node to read, and press OK.
- Repeat steps 5 to 9 as needed.
- Press the OK button to close the collection editor.
- Press the “Invoke” button to read the data.
- You can view the results in the row “return: UAAttributeDataResult[]” of the “Arguments” property grid; click the “+” sign to expand the row. For each element, in case of success, the AttributeData property will contain the data read. In case of an error, the Exception and other related properties will contain information the problem.
Write Value into a Single Node
- Start the “EasyOPC Forms Test Application”.
- Select and perform the “UA.ObjectTestbed” command. The “Object Testbed” form appears.
- In “Method” drop-down, select the following method: WriteValue(UAEndpointDescriptor endpointDescriptor, UANodeDescriptor nodeDescriptor, Object value): Void
- In the “Arguments” property grid, select the row “endpointDescriptor: UAEndpointDescriptor”, and click the “…” button on the right.
- From the “Browse for Host and OPC-UA Server” dialog, select the OPC-UA server endpoint, and press OK.
- In the “Arguments” property grid, select the row “nodeDescriptor: UANodeDescriptor”, and click the “…” button on the right.
- From the “Browse for OPC-UA Data” dialog, select the OPC-UA node to read, and press OK.
- In the “Arguments” property grid, select the “value: Object” row, and enter the value to be written.
- Press the “Invoke” button to write the value.
- If an errors occurs, a box with the exception details will appear. Otherwise, the data will be written.
OPC-UA Data Access
Obtain a Variable Node
- Start the “EasyOPC Forms Test Application”.
- Select and perform the “UA.ObjectTestbed” command. The “Object Testbed” form appears.
- In the “Instances” list, select the “ModelClientWithServerModel: UAModelClient” instance, and press the “Instance to ‘this’” button. Confirm the warning box about cloning (you may uncheck the “Show cloning-related warnings” box in order to prevent further warnings).
- In “Method” drop-down, select the following method: GetNode(UAEndpointDescriptor endpointDescriptor, UANodeDescriptor nodeDescriptor): Object
- In the “Arguments” property grid, select the row “endpointDescriptor: UAEndpointDescriptor”, and click the “…” button on the right.
- From the “Browse for Host and OPC-UA Server” dialog, select the OPC-UA server endpoint, and press OK.
- In the “Arguments” property grid, select the row “nodeDescriptor: UANodeDescriptor”, and click the “…” button on the right.
- From the “Browse for OPC-UA Data” dialog, select the OPC-UA node to read, and press OK.
- Press the “Invoke” button to obtain the variable node.
- The variable node appears in the “Attributes” property grid in the “return: Object” row. Note that the node contains default values. See e.g. the “Read Variable Node” for further operations with the node.
Read Variable Node
- Perform steps described under “Obtain a Variable Node”.
- In the “Arguments” property grid, select the “return: Object” row, and press “Save as new >” button. Press OK to confirm the “Instance name” box, and the warning box about cloning.
- In “Method” drop-down, select the following method: ReadNode(Object node): Void
- In the “Arguments” property grid, select the “node: Object” row. In the “Instances” list, select the instance created in step 2, and then press the “Load instance >” button. Confirm the warning box about cloning.
- Press the “Invoke” button to read the node.
- You can view the updated node data in the “Arguments” property grid, under the “node: Object” row. Expand it as needed to view the details.
OPC-UA Discovery Services
Discover Server Endpoints
- Start the “EasyOPC Forms Test Application”.
- Select and perform the “UA.ObjectTestbed” command. The “Object Testbed” form appears.
- If you want to discover server endpoints on other than the local computer: In the “Arguments” property grid, expand the “EasyUAClient” row, then expand the “Host Parameters” row. Select the “DiscoveryHost” row, and enter the name of the discovery host, or click the “…” button on the right, and select the computer interactively.
- In “Method” drop-down, select the following method: DiscoverServers(): UAApplicationElementCollection
- Press the “Invoke” button to discover the server endpoints.
- In the “Arguments” property grid, select the “return: UAApplicationElementCollection” row, and click the “…” button on the right. A “UAApplicationElement Collection Editor” appears.
- You can select any element in the “Members” list, and view its details in the property grid.
OPC-UA Subscription Services, and Monitored Items
Subscribe to a Single Node and View Notifications
- Start the “EasyOPC Forms Test Application”.
- Select and perform the “UA.ObjectTestbed” command. The “Object Testbed” form appears.
- In “Method” drop-down, select the following method: SubscribeMonitoredItem(UAEndpointDescriptor endpointDescriptor, UANodeDescriptor nodeDescriptor, Int32 samplingInterval): Int32
- In the “Arguments” property grid, select the row “endpointDescriptor: UAEndpointDescriptor”, and click the “…” button on the right.
- From the “Browse for Host and OPC-UA Server” dialog, select the OPC-UA server endpoint, and press OK.
- In the “Arguments” property grid, select the row “nodeDescriptor: UANodeDescriptor”, and click the “…” button on the right.
- From the “Browse for OPC-UA Data” dialog, select the OPC-UA node to read, and press OK.
- In the “Arguments” property grid, select the row “samplingInterval: Int32”, and enter the sampling interval (in milliseconds), e.g. 1000.
- Press the “Invoke” button to subscribe to the data.
- The notifications about data changes will appear in the “Events” part of the Object Testbed form, as “MonitoredItemChanged” events. You can expand the events and view its details as needed.
Subscribe to a Multiple Nodes and Observe Results
- Start the “EasyOPC Forms Test Application”.
- Select and perform the “LiveData” command. The “OPC-UA Live Data” form appears.
- On the toolbar, press the “Bulk Add…” button.
- From the “Browse for OPC-UA Data” dialog, select the OPC-UA nodes to subscribe. When you focus any node, you can select it by pressing the button with the “down arrow” above the “Selected nodes” list. Multiple nodes from the same parent node can be selected as well.
- When you are finished selecting the nodes, and press OK.
- The live results now appear on the “OPC-UA Live Data Form”. You can hover over items in the list to view more details, where available.
OPC-UA View Services
Browse for Nodes Interactively
- Start the “EasyOPC Forms Test Application”.
- Select and perform the “Dialogs” command. The “Dialogs” form appears.
- From the “Available dialogs” list, select the “UADataDialog” item.
- In the “Dialog properties” property grid, select the “EndpointDescriptor” row, and click the “…” button on the right.
- From the “Browse for Host and OPC-UA Server” dialog, select the OPC-UA server endpoint, and press OK.
- Press the “Show…” button.
- Use the “Browse for OPC-UA Data” to explore the nodes in the server.


