Using OpcCmd Utility as OPC A&E Client: Difference between revisions
No edit summary |
|||
| (8 intermediate revisions by the same user not shown) | |||
| Line 8: | Line 8: | ||
# Start the OpcCmd utility in interactive mode. The interactive mode is always in effect e.g. when you use ClickOnce, or when running the utility from QuickOPC Launcher/Start menu. In other cases, you need to use the <code>-i</code> (or <code>--interactive</code>) option on the command line.<br/><br/> | # Start the OpcCmd utility in interactive mode. The interactive mode is always in effect e.g. when you use ClickOnce, or when running the utility from QuickOPC Launcher/Start menu. In other cases, you need to use the <code>-i</code> (or <code>--interactive</code>) option on the command line.<br/><br/> | ||
# At the {{Style=label|OpcCmd>}} prompt, enter {{Style=keyboard|aeClient}}, or shortened: {{Style=keyboard|aec}}. | # At the {{Style=label|OpcCmd>}} prompt, enter {{Style=keyboard|aeClient}}, or shortened: {{Style=keyboard|aec}}. This command tells the utility that we will be using OPC Alarms&Events subcommands from this point onwards. The program responds with a list of technologies supported ("Com").<br/><br/>All following commands are entered at the {{Style=label|aeClient>}} prompt. You can enter <code>-?</code>, <code>-h</code> or <code>--help</code> (possibly preceded by the command name) at any time to obtain help for this prompt (or its commands).<br/><br/> | ||
# In order to obtain a list of OPC A&E servers registered on your computer, enter {{Style=keyboard|browseServers}} (<code>browseServers</code> can be shortened to <code>bs</code>).<br/>The command displays a table of available servers and their descriptions. The "URL String" columns contains URLs that start with "opcae:", and the first part of the URL path is a ProgID of the server (ProgID is a symbolic name given to the OPC A&E server, and OPC clients use it to connect to the server). Here is an example output from the command:<br>[[File:Opccmd-aeclient-browseservers.png|1011px|Command output of: OpcCmd aeClient browseServers]]<br/>In this example, "OPCLabs.KitEventServer.2" is the ProgID of the (Alarms&Events part of the) OPC Kit Server. The remaining part of the URL path contains server's CLSID. The CLSID can also be used to establish a connection to the server, but ProgIDs are more "user friendly".<br/><br/> | # In order to obtain a list of OPC A&E servers registered on your computer, enter {{Style=keyboard|browseServers}} (<code>browseServers</code> can be shortened to <code>bs</code>).<br/>The command displays a table of available servers and their descriptions. The "URL String" columns contains URLs that start with "opcae:", and the first part of the URL path is a ProgID of the server (ProgID is a symbolic name given to the OPC A&E server, and OPC clients use it to connect to the server). Here is an example output from the command:<br>[[File:Opccmd-aeclient-browseservers.png|1011px|Command output of: OpcCmd aeClient browseServers]]<br/>In this example, "OPCLabs.KitEventServer.2" is the ProgID of the (Alarms&Events part of the) OPC Kit Server. The remaining part of the URL path contains server's CLSID. The CLSID can also be used to establish a connection to the server, but ProgIDs are more "user friendly".<br/><br/> | ||
# Display the areas and sources inside the OPC A&E Server by entering {{Style=keyboard|browseNodes OPCLabs.KitEventServer.2 --tree}} (shortened: {{Style=keyboard|bn OPCLabs.KitEventServer.2 -t}}). Here is an example output from the command:<br>[[File:Opccmd-aeclient-browsenodes-tree.png]]<br/> | # Display the areas and sources inside the OPC A&E Server by entering {{Style=keyboard|browseNodes OPCLabs.KitEventServer.2 --tree}} (shortened: {{Style=keyboard|bn OPCLabs.KitEventServer.2 -t}}). Here is an example output from the command:<br>[[File:Opccmd-aeclient-browsenodes-tree.png]]<br/>Other forms of this command allow you to display just a table of sources or areas, and specify starting area name and/or browse and vendor filters.<br/><br/> | ||
# In order to query the server for the event categories it supports, enter {{Style=keyboard|queryEventCategories OPCLabs.KitEventServer.2}} (<code>queryEventCategories</code> can be shortened to <code>qec</code>). Here is an example output from the command:<br>[[File:Opccmd-aeclient-queryeventcategories.png]]<br/>Each category is identified by a unique number. This number (Event ID) can be used e.g. if you later want to subscribe only to notifications that belong to a specific category. A category also specifies Event Attributes, i.e. data fields that can be provided with every event notification for that category. Finally, a category defines a set of Event Conditions. On an event source, each event condition represents an individual state machine, and notifications are generated for transitions between the states.<br/><br/> | |||
# You can subscribe to events generated by the server, and display the notifications as they come in. To do so, enter {{Style=keyboard|subscribeEvents OPCLabs.KitEventServer.2}} (<code>subscribeEvents</code> can be shortened to <code>se</code>). By default, the program subscribes and then displays the notifications for 1 minute; you can always stop the execution and unsubscribe from the events by pressing {{Style=keyboard|X}} on the keyboard. A sample output from this command may look like this:<br/>[[File:Opccmd-aeclient-subscribeevents.png]]<br/>Using various command options, you can specify subscription filter and other parameters. For example, you may subscribe only to events that belong to certain area or source. Or, you can filter by low and high severity of the event, or only subscribe to specified event categories. You can also change the notification rate (default is 1000 milliseconds).<br/><br/> | |||
# The default output from the <code>subscribeEvents</code> command only shows a brief summary of each received event. There is much more information to each event. If you are interested in detailed data of a particular event, first determine the index of the event in the sequence (event number): It is the number in angle brackets at the beginning of the line, such as "[2]". Then, use the <code>events?</code> command (can be shortened to <code>ev?</code>) with the event number as its argument, such as: {{Style=keyboard|events? 2}}. | |||
= Commands, Arguments and Options = | = Commands, Arguments and Options = | ||
| Line 39: | Line 42: | ||
<code>OpcCmd daClient writeItem OPCLabs.KitServer.2 SimulateEvents.ConditionState1.Activate [Boolean]True</code> | <code>OpcCmd daClient writeItem OPCLabs.KitServer.2 SimulateEvents.ConditionState1.Activate [Boolean]True</code> | ||
== Other commands == | |||
Other commands at the {{Style=label|aeClient>}} prompt, not individually described or used in the tutorial, include: | |||
* <code>getConditionState</code> | |||
* <code>querySourceConditions</code> | |||
= Using OPC NET API implementation = | = Using OPC NET API implementation = | ||
If you want to use the OPC NET API implementation instead of the native implementation (in OpcCmd for .NET Framework), you can do it interactively as in the following example: | If you want to use the OPC NET API implementation instead of the native implementation (in OpcCmd for .NET Framework), you can do it interactively as in the following example: | ||
| Line 56: | Line 63: | ||
} | } | ||
</syntaxhighlight> | </syntaxhighlight> | ||
Note that in .NET Core and .NET 5.0+, OPC NET API is the only available implementation and is thus selected by default. | |||
Latest revision as of 20:20, 15 March 2021
For general information about the OpcCmd tool, see Category:OpcCmd Utility.
Tutorial
If you execute the commands listed in the tutorial below, you will get an overview of basic OPC A&E client operations.
This tutorial works with the OPC Kit Server, which is installed with QuickOPC, or available for download from the Tool Downloads page. You should be able to use the same tutorial with your own OPC A&E Server, by modifying the server ProgID and in the commands.
- Start the OpcCmd utility in interactive mode. The interactive mode is always in effect e.g. when you use ClickOnce, or when running the utility from QuickOPC Launcher/Start menu. In other cases, you need to use the
-i(or--interactive) option on the command line. - At the OpcCmd> prompt, enter aeClient, or shortened: aec. This command tells the utility that we will be using OPC Alarms&Events subcommands from this point onwards. The program responds with a list of technologies supported ("Com").
All following commands are entered at the aeClient> prompt. You can enter-?,-hor--help(possibly preceded by the command name) at any time to obtain help for this prompt (or its commands). - In order to obtain a list of OPC A&E servers registered on your computer, enter browseServers (
browseServerscan be shortened tobs).
The command displays a table of available servers and their descriptions. The "URL String" columns contains URLs that start with "opcae:", and the first part of the URL path is a ProgID of the server (ProgID is a symbolic name given to the OPC A&E server, and OPC clients use it to connect to the server). Here is an example output from the command:
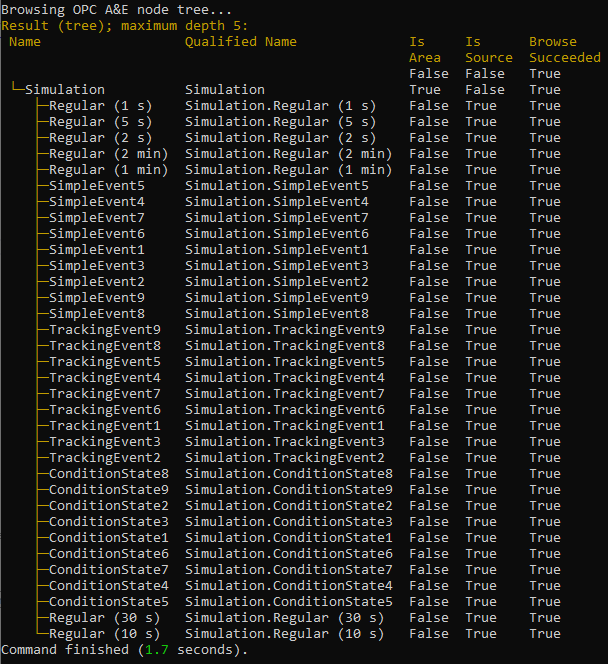
In this example, "OPCLabs.KitEventServer.2" is the ProgID of the (Alarms&Events part of the) OPC Kit Server. The remaining part of the URL path contains server's CLSID. The CLSID can also be used to establish a connection to the server, but ProgIDs are more "user friendly". - Display the areas and sources inside the OPC A&E Server by entering browseNodes OPCLabs.KitEventServer.2 --tree (shortened: bn OPCLabs.KitEventServer.2 -t). Here is an example output from the command:

Other forms of this command allow you to display just a table of sources or areas, and specify starting area name and/or browse and vendor filters. - In order to query the server for the event categories it supports, enter queryEventCategories OPCLabs.KitEventServer.2 (
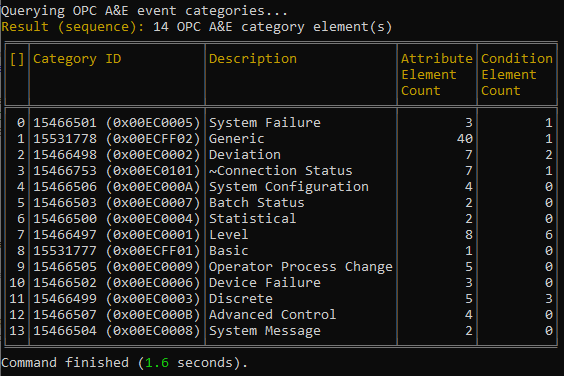
queryEventCategoriescan be shortened toqec). Here is an example output from the command:
Each category is identified by a unique number. This number (Event ID) can be used e.g. if you later want to subscribe only to notifications that belong to a specific category. A category also specifies Event Attributes, i.e. data fields that can be provided with every event notification for that category. Finally, a category defines a set of Event Conditions. On an event source, each event condition represents an individual state machine, and notifications are generated for transitions between the states. - You can subscribe to events generated by the server, and display the notifications as they come in. To do so, enter subscribeEvents OPCLabs.KitEventServer.2 (
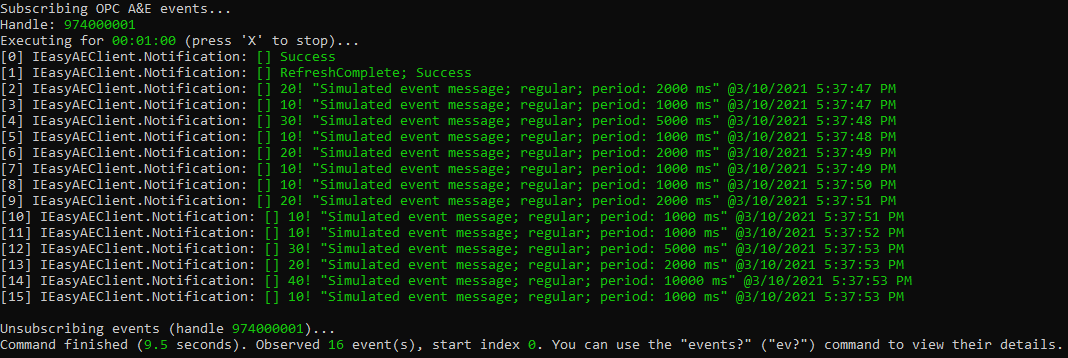
subscribeEventscan be shortened tose). By default, the program subscribes and then displays the notifications for 1 minute; you can always stop the execution and unsubscribe from the events by pressing X on the keyboard. A sample output from this command may look like this:
Using various command options, you can specify subscription filter and other parameters. For example, you may subscribe only to events that belong to certain area or source. Or, you can filter by low and high severity of the event, or only subscribe to specified event categories. You can also change the notification rate (default is 1000 milliseconds). - The default output from the
subscribeEventscommand only shows a brief summary of each received event. There is much more information to each event. If you are interested in detailed data of a particular event, first determine the index of the event in the sequence (event number): It is the number in angle brackets at the beginning of the line, such as "[2]". Then, use theevents?command (can be shortened toev?) with the event number as its argument, such as: events? 2.
Commands, Arguments and Options
Command: aeClient subscribeEvents
Example:
OpcCmd -i
aeclient
subscribeEvents OPCLabs.KitEventServer.2
Command: aeClient acknowledgeCondition
The acknowledgeCondition command (can be shortened to ac) acknowledges a condition in the events server.
Acknowledging a condition requires an event to be identified by a precise combination of several pieces of information. In order to make the acknowledging easier, the acknowledgeCondition command allows you to pick the event from those collected during previous event subscriptions. Using the --eventIndex option (can be shortened to -ei), you specify the index of the event you want to acknowledge.
When event output is on, the event indexes appear in front of every displayed event in angle brackets, such as "[2]". You can also use the events? command (ev?) to display the events previously collected.
Example:
OpcCmd -i
aeclient
subscribeEvents OPCLabs.KitEventServer.2 -sqn Simulation.ConditionState1
events?
acknowledgeCondition --eventIndex 2
In order to trigger an acknowledgeable event for the previous example, you can start a second instance of the OpcCmd utility and pass it a corresponding command, like this:
OpcCmd daClient writeItem OPCLabs.KitServer.2 SimulateEvents.ConditionState1.Activate [Boolean]True
Other commands
Other commands at the aeClient> prompt, not individually described or used in the tutorial, include:
getConditionStatequerySourceConditions
Using OPC NET API implementation
If you want to use the OPC NET API implementation instead of the native implementation (in OpcCmd for .NET Framework), you can do it interactively as in the following example:
OpcCmd -i
aeclient --property InstanceParameters.EnableNativeClient=[Boolean]false
subscribeEvents subscribeEvents OPCLabs.KitEventServer.2
If you want to use such setting permanently, you can modify one of the OpcCmd Intrinsic Component Configuration files (JSON, INI or XML). For example, with the JSON format, put the following into the appsettings.json or appsettings.production.json file:
{
  "OpcLabs.EasyOpc.AlarmsAndEvents.EasyAEClient": {
    "InstanceParameters": {
      "EnableNativeClient": false
    }
  }
}
Note that in .NET Core and .NET 5.0+, OPC NET API is the only available implementation and is thus selected by default.