QuickOPC.NET: How to create a simple HMI screen
In this article, we will create a Windows Forms application that shows how to use implement an HMI screen by storing OPC Item IDs in the Tag property of screen controls, and animate the controls by subscribing to all items at once. We will also show a possibility how to write to an OPC item from the screen.
Note: Starting with version 5.20, the same outcome can be achieved more easily, with the use of Live Binding (no coding required).
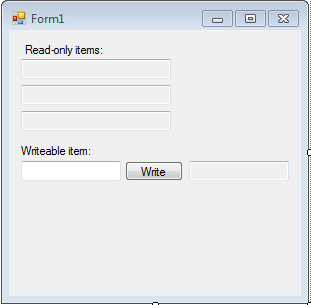
The first step is to create the form, and place the required controls on it. We will use plain TextBox controls for simplicity, but you can create much fancier user interfaces by using different and advanced controls and changing their properties based on OPC data.
We will also place an EasyDAClient non-visual component on the form. This can be done by placing it on the Toolbox and then dragging from there; please read the Quick Start or Concepts documents for instructions on this.
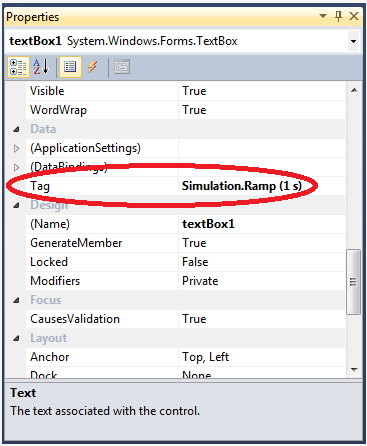
We will use a "trick" here that allows us to link each control directly to its corresponding OPC item. We will store the OPC Item ID (a string) in a Tag property of each control that we want to have periodically updated. For example, for our first text box:
In the Load handler of the form, we will go through all controls on the form. For each control that has non-null Tag, we will subscribe to OPC item specified by that tag. For performance reasons, it is wise to subscribe to multiple items at once, so we will first assemble a list "arguments", and then subscribe in a single method call. Each DAItemGroupArguments object has a State property (the last argument in its constructor) that can be an arbitrary object; we will pass in a reference to the control being subscribed. This will later allow us to directly update the control, when a change notification arrives, without having to look it up.
Next, we will write a handler for the ItemChanged event of the EasyDAClient object. This handler will be called for any significant change in the items we have subscribed to. In the event handler, we will inspect the State property of the event arguments, and if it corresponds to a TextBox control, we will update its text either by the value that has arrived (if there was no exception), or by an error text.
    public partial class Form1 : Form
    {
        public Form1()
        {
            InitializeComponent();
        }

        private void Form1_Load(object sender, EventArgs e)
        {
            var argumentsList = new List<DAItemGroupArguments>();
            foreach (Control control in Controls)
            {
                var itemId = control.Tag as string;
                if (itemId != null)
                    argumentsList.Add(new DAItemGroupArguments("", "OPCLabs.KitServer.2", itemId, 50, control));
            }
            easyDAClient1.SubscribeMultipleItems(argumentsList.ToArray());
        }

        private void easyDAClient1_ItemChanged(object sender, EasyDAItemChangedEventArgs e)
        {
            var textBox = e.State as TextBox;
            if (textBox != null && textBox.ReadOnly)
            {
                if (e.Exception == null)
                    textBox.Text = e.Vtq.DisplayValue();
                else
                    textBox.Text = Resources.Form1_easyDAClient1_ItemChanged____Error___;
            }
        }

        private void writeButton_Click(object sender, EventArgs e)
        {
            TextBox textBox = writeValueTextBox;
            easyDAClient1.WriteItemValue("", "OPCLabs.KitServer.2", (string)textBox.Tag, textBox.Text);
        }
    }
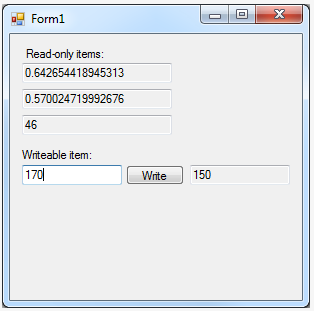
The last method in the example allows a communication in the opposite direction, e.g. for process setpoints. Pressing the "Write" button takes the value entered by the user into the text box, and writes it into an OPC item. When you run the application, it will show quickly updating values and allow you to perform the Write operation:
This application is fully resistant against network problems, OPC server crashes etc. You do not need to write any additional code for that! To prove it, find and select the OPC Simulation Server process (opcrtkit.exe) in the Task Manager, and "kill it" by pressing the "End process" button. You will see that the values on the form change to an error text. If you, however, wait for some minutes, you will see that the server process restarts itself (this is caused by the reconnection facility in the QuickOPC component), and valid values appear on the form again. The reconnection delays can be influenced by setting various properties on EasyDAClient object.
This example project is included with the product. Please use the example from the product itself for the most up-to-date code of the example.


